How to install oscam on Raspberry PI

Requirments
I have already tested on Raspbian, Noobs and Ubuntu Core. But it might work on all Linux kernel Operating System too.
You have to downloads following application in order to complete OSCAM installation on your PI
Noobs or Raspbian
Etcher or Win32DiskImager (I will Explain using Etcher since it is easier than Win32DiskImager )
https://etcher.io/
16 GB Memory Card or May be less than but if you use 2 GB even not vbad with Raspberry PI old Versions.
How to Install Raspbian
Downloads Raspbian from
https://www.raspberrypi.org/downloads/
But if you use older version of Raspberry PI like Version 1 and 2, or if you don't have bigger Memory card, You should not worry and Go and get older version
http://downloads.raspberrypi.org/raspbian/images/
How ever You should have an idea which version suit for your raspberry pi, Other wise you may not fully utilize your raspberry PI
Installation Procedure
Copy downloaded file to your hard drive. Unzip file and Store.
Install Etcher and Start Etcher, Select Your stored image file
How to Copy File, Check the Below Image

Select Your Memory Card, Always system select memory card automatically and if you have fixed few memory card readers, then you have to select desired one. see the Below image.

Click Flash button and wait and see until complete process. don't be panic to click anywhere until complete copy process.

Booting First Time Your Raspberry PI
Remember that the default login for this image is :
Username : pi
Password : raspberry
You need to configure followings on your raspberry pi before install oscam
To Set Static IP Address. Right click on the Up and Down Arrow marks on top right corner

How to select the Menu

Then click on it and you will get a screen

to Configure - Select IT as interface and in Red Box select as eth0. Now you have selected Wired Network as Raspberry PI Ethernet. enter your Local network IP address to IP Address Box, Example If your Local network is in 192.168.1.0 network, enter available IP address. In gateway Just enter our router IP address. How ever you need to have an idea about what is gateway. Enter google DNS to DNS Lines. And Press apply and then close. Then Restart your Raspberry PI.
Configure SSH and VNC Server. VNC server is free for Raspberry PI raspbian and You need to have VNC Client on your Desktop.
After restarting Your Raspberry PI, Go to Start Menu On Your Raspberry PI (Click Raspberry ICON) on your Left top corner.
Go to Preferences --> Raspberry PI Configurations

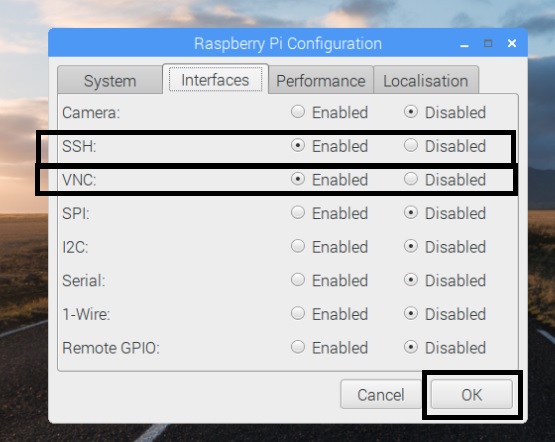
Select SSH - Enabled and VNC -- Enabled --> Then Press ok and Restart Your PI again. Now you are ready to install OSCAM
Now you can keep alone your raspberry pi just with connecting to power and network

Starting Installation OSCAM
Downloads Following Application to your Computer now, Before that Switch on your Raspberry PI and keep one minute for boot.
1. Downloads VNC Client. (https://www.realvnc.com/en/download/viewer/)
2. Putty (http://www.putty.org/)
Even If you use VNC Client, or putty. You can use Terminal for Installing OSCAM. I use Putty to install OSCAM
Since you use SSH, You have to use following settings on putty, assume your raspberry PI Ip address is 192.168.1.10

Press Open Following Screen will appear,
No One : User Name for Raspberry PI : pi
then Password : raspberry

Starting Installation, make sure again Internet connection for raspberry pi
Launch putty.exe.
Enter IP address of the raspberry, in the Hostname field.
Click on “Open“.
Accept the certificate and login with the “pi/raspberry” account
Install required files and applications to install oscam, Since you don't have updated your PI, first we need to update PI by following command, for your easy you can copy command and click on putty terminal right button of mouse, it will automatically paste.
sudo apt-get update
It will take some time to update and once complete, The sudo command is used when you need to do something that requires permissions of a superuser. We use it because the “pi” account is not a superuser and system level operations like installing packages need a superuser account.
Now, let´s install the packages for compiling Oscam.
sudo apt-get install subversion cmake build-essential libssl-dev libpcsclite1 libpcsclite-dev dialog
Go to your home directory.
cd ~
command to Download libusb sources from sourceforge.
wget http://sourceforge.net/projects/libusb/files/libusb-1.0/libusb-1.0.9/libusb-1.0.9.tar.bz2
Command for extracting sources.
command to Compile libusb and install.tar xjvf libusb-1.0.9.tar.bz2
cd libusb-1.0.9
./configuremakesudo make installBack to home directory.
cd ~Once you complete Installation necessary files and applications, then you need to follow commands Since we are installing oscam-SVN version, so we are going to downloads it from oscam site and compile You can get OSCam source code from SVN, using the following command:svn checkout http://www.streamboard.tv/svn/oscam/trunk oscam-svnThen we move in to source folder
cd oscam-svn
mkdir oscamMake
Then get in to oscamMake folder
cd oscamMake
Then we use cmake to prepare build
cmake ..
Compiling oscam using
make
Then we install oscam, once you install oscam, if there was no error, your bin files will be located at etc/local/bin. so you need to type below command.
sudo make install
You have to copy all oscam configuration files to /usr/local/etc
Before that you need to make change ownership with
sudo chown -R pi.pi /usr/local/etc
but you should mind that, without giving proper rights to that folder, you will not be allowed to copy files, we are going to give rights using following command
you can use filezila to update your file to /usr/local/etc. Downloads Filezila from following link
https://filezilla-project.org/download.php
run oscam using
sudo /etc/local/bin/oscam
and use your web browser to check oscam
192.168.1.10:8888 initially, if you change webif port, then you have to use your changed port
If you face any difficulty, please discuss on following replay section. your comments are welcome.

This comment has been removed by the author.
ReplyDelete[ 30%] Building C object CMakeFiles/csreaders.dir/reader-cryptoworks.o
ReplyDelete/home/pi/oscam-svn/reader-cryptoworks.c:11:18: error: field ‘exp’ has incomplete type
BIGNUM exp;
^~~
/home/pi/oscam-svn/reader-cryptoworks.c:12:18: error: field ‘ucpk’ has incomplet e type
BIGNUM ucpk;
^~~~
CMakeFiles/csreaders.dir/build.make:134: recipe for target 'CMakeFiles/csreaders .dir/reader-cryptoworks.o' failed
make[2]: *** [CMakeFiles/csreaders.dir/reader-cryptoworks.o] Error 1
CMakeFiles/Makefile2:110: recipe for target 'CMakeFiles/csreaders.dir/all' faile d
make[1]: *** [CMakeFiles/csreaders.dir/all] Error 2
Makefile:149: recipe for target 'all' failed
make: *** [all] Error 2
install openssl-dev and youre problem is solved ...
DeleteHi,
ReplyDeleteIt is really a nice blog with lots of informative stuff about Network, i really appreciate your research & knowledge. Nice Post.....
please visit our site also to know about High Speed Network Booster.
WARNING: oscam.conf line 58 section [cccam] contains unknown setting 'build=1234'
ReplyDeletecouldn't open logfile: /var/log/oscam/oscam.log (errno 2 No such file or directory)
Warning: keyword 'aeskey' in reader section not recognized
Warning: keyword 'cccbuild' in reader section not recognized
Warning: keyword 'aeskey' in reader section not recognized
Warning: keyword 'aeskey' in reader section not recognized
Same problem, any suggestion to resolve it?
Deletehow to set it to start at system startup ?
ReplyDeletehi mate. sudo /etc/local/bin/oscam is not working. any suggestions
ReplyDeletesudo /usr/local/bin/oscam
Deletehello,
DeleteYes
sudo /usr/local/bin/oscam works.
Question: How can i compile this Oscam
thanky you for your good Work
ReplyDeleteWelcome to the our website Najm1sat, Najm1sat provides you all you need to know about the satellite of the frequencies of channels, channel key, frequencies of feed, feed key...
najm sat
thanks for this great post.
ReplyDeletefollow your guide and everything is working like a charm !!!
Just one question : how can i put oscam starting at boot ? or even better, it is possible to transform it in a service, where we can use something like : "sudo service oscam start / restart / stop / status
Thanks
Hello Pedro
ReplyDeleteU can use systemd as a service for oscam like this:
[Unit]
Description=OScam
After=network.target
Requires=network.target
[Service]
Type=forking
PIDFile=/var/run/oscam.pid
ExecStart=/usr/local/bin/oscam -b -B /var/run/oscam.pid
ExecStop=/usr/bin/rm /var/run/oscam.pid
TimeoutStopSec=1
Restart=always
RestartSec=5
StartLimitInterval=0
[Install]
WantedBy=multi-user.target
More infos here:
http://webcache.googleusercontent.com/search?q=cache:XsI_UixU8dgJ:techblog.thomserve.co.uk/2016/09/30/systemd-script-for-oscam/+&cd=7&hl=de&ct=clnk&gl=de
regards
Thanks for this post.
ReplyDeleteFollow your guide and everything is working fine.
But, two things:
1. i have to start oscam in /usr/local/bin/oscam
you know why?
2. How can I start oscam when rasp reboot? without a service.
Thnaks
Everything installed OK.
ReplyDeleteCopied all config files to /usr/local/etc
Running OSCAM /usr/local/bin/oscam OK:
But if I try to open 10.0.0.20:8888 I get in Chrome message: "Connection refused."
In Firefox i get: "Firefox can not establish connection to server 10.0.0.20:8888"
What can I do?
Thanks.
Hi
ReplyDeletewould it be the same for ubuntu server in rpi4? ,, and to add oscam emu what steps would be
Super-Duper site! I am Loving it!! Will come back again, Im taking your feed also, Thanks. oscam server
ReplyDeleteNice to be visiting your blog again, it has been months for me. Well this article that i’ve been waited for so long. I need this article to complete my assignment in the college, and it has same topic with your article. Thanks, great share. oscam testline
ReplyDeleteThe candidate was to refrain from smoking marijuana which she didn’t. Regardless, after a few rounds of peeing, much to everyone’s surprise, the volunteer passed the test, and no THC was detected whatsoever. This small at-home experiment further boosted our recommendation for this Mega Clean Detox Drink. This is why it was important for us to address the issue of "how to pass hair follicle drug tests". In this article, we have discussed various solutions to this question. We have covered very effective ways to pass this test. Visit: https://www.urineworld.com/
ReplyDeletehello
ReplyDeletethe best website for Cccam and IPTV https://cccam.net/
ReplyDeleteOthers who have a little more time often use a detox kit and program to permanently cleanse their system so they can pass a urine test anytime. If you smoke weed daily, it may show up in your urine for 30-45 days after your last session, and potentially longer. This varies based on what kind of cannabis products you consume and body factors, such as metabolism and body fat percentage. The potency of the cannabis you consume also plays a role; someone who prefers concentrates and extracts over smoking joints may test positive for THC for up to 60 days due to the high concentration of THC. Light to moderate users (a couple of times a month to a couple of times a week) may pass their test in 15-30 days. See more information about detection factors below. Blood testing is rather expensive and invasive (they require extracting blood from the subject), so it isn’t used often.
ReplyDeleteIn almost a week, the tablets, along with complimentary drinks, may clean up your blood, urine, and saliva so that you do not fail the drug test owing to can consumption more than a week ago. If you take up the pills, you must refrain from consuming any further can or restricted items. To maintain the program’s effectiveness, you must avoid heavy and intense exercises as they will slow down the process of detoxification. You have to take 15 pills of toxyn rayd daily (taking three capsules per hour, per day) for five successive days for effective results. If you have consumed a large amount of can, you might need to take a more extended brand program to clear the drug test. toxyn rayd tablets are made with natural ingredients only, and no animal products, artificial additives, or fluff ingredients are used. The pills start up the detoxifying action within an hour of consumption and are suitable for Urine, Saliva, and Blood drag test.
ReplyDeleteGreat and I have a swell offer you: What House Renovations Can You Claim On Tax split level house kitchen remodel
ReplyDeleteThanks and that i have a tremendous provide: How To House Renovation house exterior renovation
ReplyDelete